How to Import Bank Statements into QuickBooks Online
Every method for getting bank statement data into QuickBooks - from bank feeds to PDF conversion. Includes CSV formatting rules and troubleshooting.
You've got a PDF bank statement from a client. Maybe it's from a closed account, a prior tax year, or an international bank that QuickBooks doesn't connect to. You need those transactions in QuickBooks Online. Yesterday.
Here's the problem: QuickBooks can't read PDFs directly (well, not reliably). And bank feeds only go back 90 days. So how do you get six months of historical transactions into your books?
This guide covers every method - from automatic bank feeds to manual file uploads to converting PDFs into QuickBooks-ready formats. By the end, you'll know exactly which approach works for your situation and how to avoid the common pitfalls that trip up even experienced bookkeepers.
The Three Ways to Get Bank Data into QuickBooks
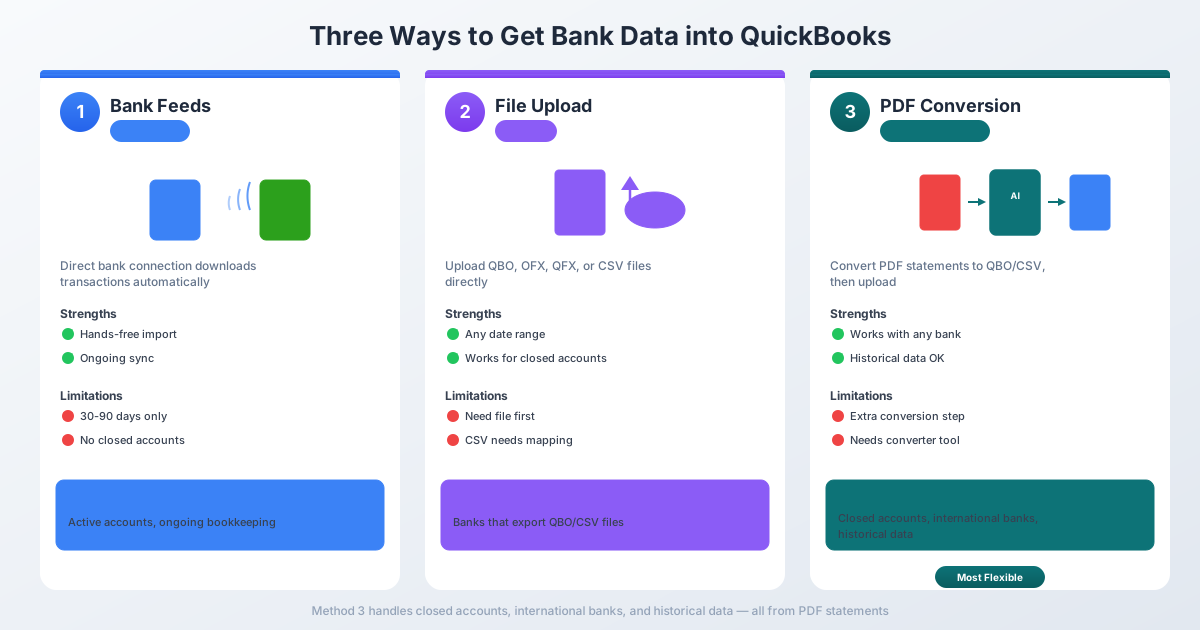
QuickBooks Online offers three methods for importing bank transactions. Each has strengths and limitations - and knowing when to use which one will save you hours of frustration.
Method 1: Bank Feeds (Automatic Connection)
This is the method QuickBooks wants you to use. You connect your bank account directly, and transactions flow in automatically.
How it works: Go to Banking → Link account → search for your bank → sign in with your bank credentials. QuickBooks establishes a secure connection and downloads transactions automatically.
The catch: Bank feeds typically pull only the last 30 to 90 days of transactions. Some banks allow up to 24 months, but most cap at 90 days. And once a connection is established, it only pulls new transactions going forward.
Bank feeds work great when:
- The account is currently open and active
- You only need recent transactions
- Your bank is on QuickBooks' supported list
- You're doing ongoing, month-to-month bookkeeping
Bank feeds don't work when:
- The account is closed - no connection possible
- You need transactions older than 90 days
- Your bank isn't supported (common with international banks and small credit unions)
- The bank's security updates break the connection (happens more often than you'd think)
- You're onboarding a new client and need historical data
If bank feeds cover your needs, use them. They're the easiest option. But for everything else, you'll need one of the next two methods.
Method 2: Manual File Upload (CSV, QBO, OFX)
QuickBooks lets you manually upload transaction files in several formats. This is the go-to method for historical data, closed accounts, and unsupported banks.
Supported file formats:
| Format | Extension | Best For |
|---|---|---|
| QBO | .qbo |
QuickBooks Web Connect (recommended) |
| OFX | .ofx |
Open Financial Exchange (universal) |
| QFX | .qfx |
Quicken Financial Exchange |
| CSV | .csv |
Comma-separated values (most flexible) |
Not supported in QuickBooks Online:
- QIF (Quicken Interchange Format)
- IIF (Intuit Interchange Format - Desktop only)
- XLS/XLSX (must convert to CSV first)
File limits: Maximum 350 KB per upload, up to 1,000 transactions per file.
How to upload:
- Go to Banking (or Transactions → Bank Transactions)
- Select the account tile, or click Link account → Upload from file
- Drag and drop or browse for your file
- If CSV: map the columns (Date, Description, Amount)
- Select the correct date format
- Review the parsed transactions
- Click Done - transactions appear in the For Review tab
The key question is: where do you get a QBO or CSV file when all you have is a PDF? That's where Method 3 comes in.
Method 3: Convert PDF to a QuickBooks-Ready Format
This is the method most accountants actually need - but it's the one QuickBooks barely supports natively.
QuickBooks Online does have a built-in PDF upload feature that uses AI to extract transactions. But it's limited: 350 KB file size cap and English-only. For multi-page statements, international banks, or non-English documents, it won't work.
The better approach: use a bank statement converter to transform your PDF into a QBO or CSV file, then upload that file using Method 2.
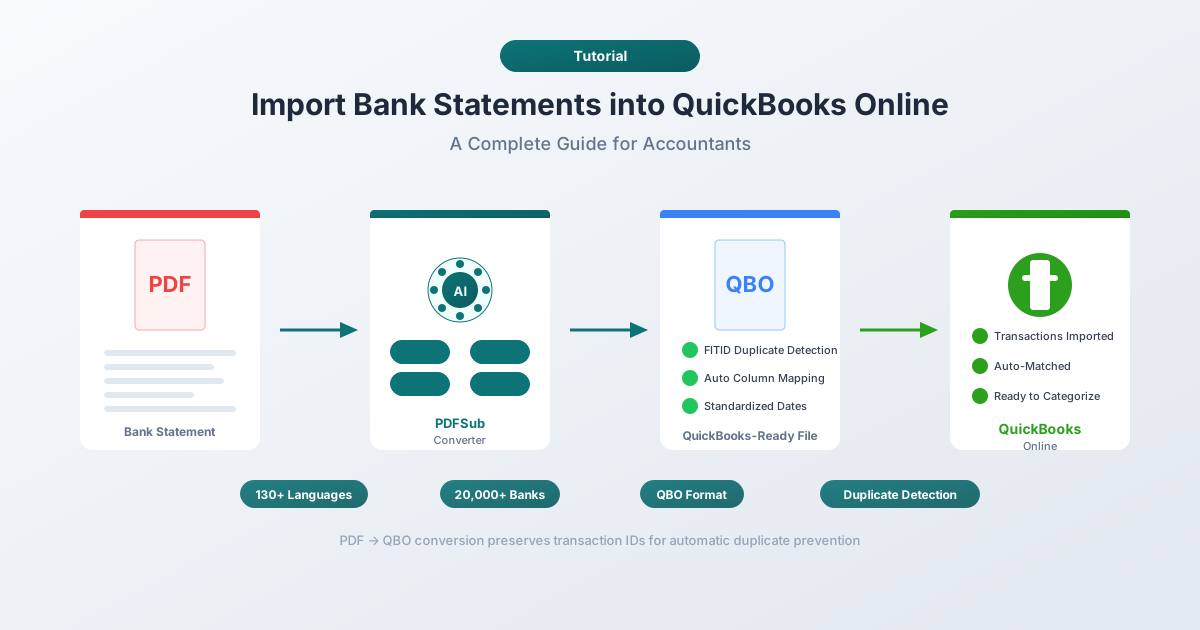
Tools like PDFSub specialize in this. You upload your PDF bank statement, select QBO or CSV as the output format, and download a file that's ready to import into QuickBooks. No manual data entry. No column reformatting.
PDFSub handles statements in 130+ languages and works with 20,000+ banks - including the international and regional institutions that QuickBooks' bank feeds don't support.
Step-by-Step: Converting a PDF Bank Statement for QuickBooks
Here's the complete workflow from PDF to reconciled transactions in QuickBooks:
Step 1: Convert Your PDF
- Go to PDFSub's Bank Statement Converter
- Upload your PDF bank statement
- Select QBO as the output format (recommended) or CSV if you prefer
- Download the converted file
Why QBO over CSV? QBO files include unique transaction IDs (called FITIDs) that QuickBooks uses for duplicate detection. CSV files don't have this - if you accidentally upload the same CSV twice, you'll get duplicate entries with no warning.
Step 2: Upload to QuickBooks
- In QuickBooks Online, go to Banking
- Select the bank account you want to import into
- Click the Link account dropdown → Upload from file
- Select your downloaded QBO or CSV file
Step 3: Map Your Columns (CSV Only)
If you uploaded a CSV, QuickBooks will ask you to map your columns:
- Column 1: Date
- Column 2: Description
- Column 3: Amount (single column) - or Credit and Debit (two columns)
Select the date format that matches your file (MM/DD/YYYY or DD/MM/YYYY).
QBO files skip this step entirely - the format handles column mapping automatically.
Step 4: Review and Accept
Imported transactions land in the For Review tab. From here:
- Match transactions to existing entries (transfers, manually entered transactions)
- Categorize new transactions to the correct accounts
- Add confirmed transactions to your books
- Exclude any duplicates or irrelevant entries
Step 5: Reconcile
Once transactions are accepted, run your monthly reconciliation (Banking → Reconcile). Compare your QuickBooks ending balance against the bank statement closing balance.
QBO vs. CSV: Which Format Should You Use?
If you have a choice, always pick QBO for QuickBooks imports. Here's why:
| Feature | QBO / OFX | CSV |
|---|---|---|
| Duplicate detection | Yes (FITID-based) | No - duplicates import silently |
| Column mapping | Automatic | Manual (you map Date, Description, Amount) |
| Date format | Standardized (YYYYMMDD) | You must select the correct format |
| Amount signs | Built into format | You must ensure correct positive/negative |
| Account metadata | Included (routing number, account type) | Not included |
| Recommended by Intuit | Yes | Fallback option |
The one advantage of CSV is flexibility - you can open it in Excel and manually edit transactions before importing. But for most use cases, QBO is the cleaner path.
CSV Formatting Rules (When You Must Use CSV)
If you're working with CSV files, QuickBooks has specific formatting requirements. Get any of these wrong and the import will fail or produce incorrect data.
Column Structure
QuickBooks accepts two CSV layouts:
3-column format:
Date,Description,Amount
01/15/2026,Amazon Purchase,-49.99
01/16/2026,Direct Deposit,3500.00
4-column format:
Date,Description,Credit,Debit
01/15/2026,Amazon Purchase,,49.99
01/16/2026,Direct Deposit,3500.00,
Formatting Rules
- Header row required - the first row must contain column names
- Remove currency symbols - no
$,€, or£in the Amount column - Remove commas from numbers - write
1234.56, not1,234.56 - Consistent date format - every date must use the same format throughout
- UTF-8 encoding - save as "CSV UTF-8 (Comma delimited)" in Excel
- Forward slashes or dashes for dates - use
/or-, never backslashes - No parenthetical negatives - convert
(234.56)to-234.56 - No trailing summary rows - remove balance totals, page headers, and footer text
Pro tip: The 4-column format avoids most sign-convention headaches. If you're unsure whether withdrawals should be positive or negative, use separate Credit and Debit columns instead.
Common Import Errors (and How to Fix Them)
Even experienced bookkeepers hit these. Here's what goes wrong and how to fix it.
"The date format doesn't match"
Cause: Your CSV uses DD/MM/YYYY but QuickBooks expects MM/DD/YYYY (or vice versa).
Fix: During the import mapping step, QuickBooks asks you to select your date format. Make sure it matches your file. If dates still look wrong, open the CSV in a text editor (not Excel - it reformats dates) and verify the actual format.
Duplicate transactions after import
Cause: CSV files have no transaction IDs, so QuickBooks can't detect duplicates. If you upload the same date range twice, you get double entries.
Fix: Keep a log of which date ranges you've already imported. Better yet, use QBO format - it includes FITIDs that prevent duplicates automatically. After importing, always review the For Review tab and use Match before Add for transactions that might already exist.
Charges showing as deposits (or vice versa)
Cause: Your bank uses the opposite sign convention from what QuickBooks expects. Some banks show withdrawals as positive numbers; QuickBooks expects them as negative.
Fix: In a single Amount column, deposits should be positive and withdrawals should be negative. For credit card accounts, charges should be negative and payments positive. If your signs are backwards, multiply the Amount column by -1 in Excel before importing.
"File too large" error
Cause: Your file exceeds the 350 KB limit.
Fix: Split the file into smaller date ranges (monthly works well). Remove unnecessary columns, trim long descriptions, and ensure there's no extra whitespace or formatting bloat.
Garbled characters in descriptions
Cause: The file is saved with ANSI or Latin-1 encoding instead of UTF-8. Common with international bank exports.
Fix: In Excel, go to File → Save As and choose CSV UTF-8 (Comma delimited). If you're on a Mac, some text editors default to the wrong encoding - use "Save with Encoding → UTF-8" explicitly.
When Bank Feeds Break: The Scenarios You'll Actually Face
Bank feeds are great in theory. In practice, here are the situations where you'll need to convert and upload bank statements manually:
New client onboarding. Your new client walks in with a year's worth of PDF statements. Bank feeds can't pull historical data beyond 90 days. You need to convert those PDFs to CSV or QBO and import them.
Closed accounts. The client closed their business checking account six months ago. The bank feed connection is gone. The only records are PDF statements downloaded (or mailed) before closing.
International banks. Your client has accounts at Deutsche Bank, BNP Paribas, or ICBC. QuickBooks' bank feed list is US-centric. Most international banks aren't supported. PDF statements in German, French, or Chinese need conversion - and they need a converter that handles non-English text and date/number formats.
Tax audits and historical bookkeeping. The IRS wants three years of transaction history. Your QuickBooks data only goes back 18 months. The older records exist as PDF statements from the bank.
Bank system migrations. Your client's bank merged with another institution, changed their online portal, or updated their security. The bank feed broke, and the gap period's transactions only exist as downloadable PDF statements.
In all these cases, the workflow is the same: get the PDF, convert it to QBO or CSV, upload it to QuickBooks.
PDFSub's bank statement converter handles all of these scenarios. It supports 130+ languages (for international banks), outputs QBO files with proper FITIDs (for duplicate prevention), and auto-detects date and number formats (DD.MM.YYYY, comma-as-decimal, etc.) - so you don't have to manually reformat anything before importing.
Frequently Asked Questions
Can I import bank statements older than 90 days into QuickBooks?
Yes, but not through bank feeds. Bank feeds typically only pull the last 30–90 days of transactions. For older statements, you'll need to download them as PDFs from your bank's website, convert them to CSV or QBO format using a tool like PDFSub, and then manually upload the file through Banking → Upload from file.
What file format is best for QuickBooks bank imports?
QBO (QuickBooks Web Connect) is the best format. It includes transaction IDs for duplicate detection, standardized date formatting, and built-in sign conventions. QuickBooks recommends QBO as the preferred upload format. CSV works as a fallback but requires manual column mapping and offers no duplicate protection.
Why is QuickBooks rejecting my CSV file?
The most common causes are: missing header row, currency symbols in the Amount column (remove $), commas in numbers (1,234.56 should be 1234.56), inconsistent date formats, or file size exceeding 350 KB. Open the file in a text editor (not Excel) to check the raw formatting.
Can I import bank statements from international banks into QuickBooks?
Yes, but you'll likely need to convert them first. Most international banks aren't on QuickBooks' bank feed list, and QuickBooks' built-in PDF import only supports English documents. Use a converter that handles multiple languages and international date/number formats. PDFSub supports 130+ languages and auto-detects formats like DD.MM.YYYY and European number formatting (1.234,56).
How do I avoid duplicate transactions when importing?
Use QBO or OFX format instead of CSV - these formats include unique transaction IDs (FITIDs) that QuickBooks uses to automatically detect and prevent duplicates. If you must use CSV, keep a log of which date ranges you've already imported, and always use the Match feature in the For Review tab before clicking Add.
Does QuickBooks Online support QIF file imports?
No. QuickBooks Online does not support QIF (Quicken Interchange Format). QIF is only supported in QuickBooks Desktop. If you have a QIF file, you'll need to convert it to QBO, OFX, or CSV before importing into QuickBooks Online.
Try PDFSub Free - full access to the Bank Statement Converter and 98+ other PDF tools on the All-In-One plan ($20/user/mo annual). Cancel anytime.